利用idea构建spring boot多项目(五)
发布时间:2018-07-11
浏览次数:2292
文章来源:个人博客
经过之前的文章,我们已经能够在架构并且运行多个模块构建的spring boot框架了,但是单单本地运行还是不行的,我们最终需要打包发布到服务器上。
所以,这里介绍如何把多项目的spring boot打包成war并且发布到服务器上。
首先:
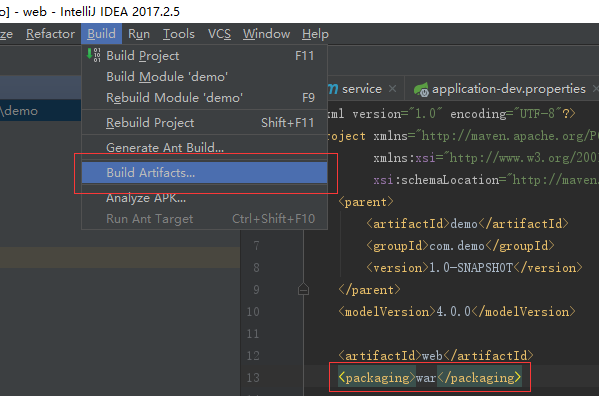
在web模块中,打开pom.xml文件,加入:
<packaging>war</packaging>
maven->reimport一下,这时候,就会在idea上面的build栏目下,build Artifacts就会能点击(之前是灰色的)

虽然出现了,但是打包还是不行,需要引入依赖(web模块中的pom.xml):
<!--打包-->
<dependency>
    <groupId>org.springframework.boot</groupId>
    <artifactId>spring-boot-starter-tomcat</artifactId>
    <scope>${scope.jar}</scope>
</dependency>
<dependency>
    <groupId>javax.servlet</groupId>
    <artifactId>servlet-api</artifactId>
    <version>2.5</version>
    <scope>provided</scope>
</dependency>
增加插件:
<build>
    <plugins>
        <plugin>
            <groupId>org.springframework.boot</groupId>
            <artifactId>spring-boot-maven-plugin</artifactId>
        </plugin>
        <plugin>
            <groupId>org.apache.maven.plugins</groupId>
            <artifactId>maven-war-plugin</artifactId>
            <configuration>
                <!--war的名字-->
                <warName>demo</warName>
            </configuration>
        </plugin>
    </plugins>
</build>
配置完后记得刷新一下maven。
接下来,我们在启动类中(DemoApplication)修改一下,加入配置:
package com.demo;

import org.springframework.boot.SpringApplication;
import org.springframework.boot.autoconfigure.SpringBootApplication;
import org.springframework.boot.builder.SpringApplicationBuilder;
import org.springframework.boot.web.servlet.support.SpringBootServletInitializer;
import org.springframework.web.WebApplicationInitializer;

@SpringBootApplication
public class DemoApplication extends SpringBootServletInitializer implements WebApplicationInitializer {
    //build配置
    @Override
    protected SpringApplicationBuilder configure(SpringApplicationBuilder application) {
        return application.sources(DemoApplication.class);
    }
    public static void main(String[] args) {
        SpringApplication.run(DemoApplication.class, args);
    }
}
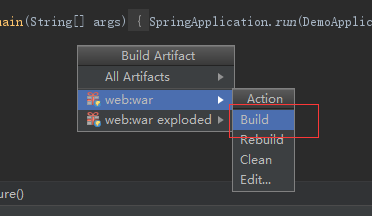
这样,我们就能通过build->build Artifacts打包了。点击build Artifacts后出现:

点击Build后,会在web模块的target目录下找到demo.war。
把war发布到webapp目录下即可~
key-word
springboot多项目 多项目构建 spring boot 多项目打包